How-to guides

Everything you need to make a book they'll keep forever.

From your first click to a printed book in their hands, one simple step at a time.

Jump to a guide

Part one

Getting started

1. Create your book

It takes about two minutes and it's free. You only pay if you order a printed book.

  1. 1
    Click Start at the top of this site. You'll land on Build your memory book.
  2. 2
    Pick a cover. Choose a designed cover (Pine, Letterpress, Clay, Ruled), or tap Your photo to use your own picture.
  3. 3
    Answer Who is this book for? and And what is the occasion? — birthday, retirement, graduation, wedding, anniversary, baby shower, farewell, thank you, holiday or other. We suggest a title and subtitle. You can change them.
  4. 4
    Enter your name, email and a password (at least 8 characters).
  5. 5
    Click Create my book & start collecting letters. No payment is needed.
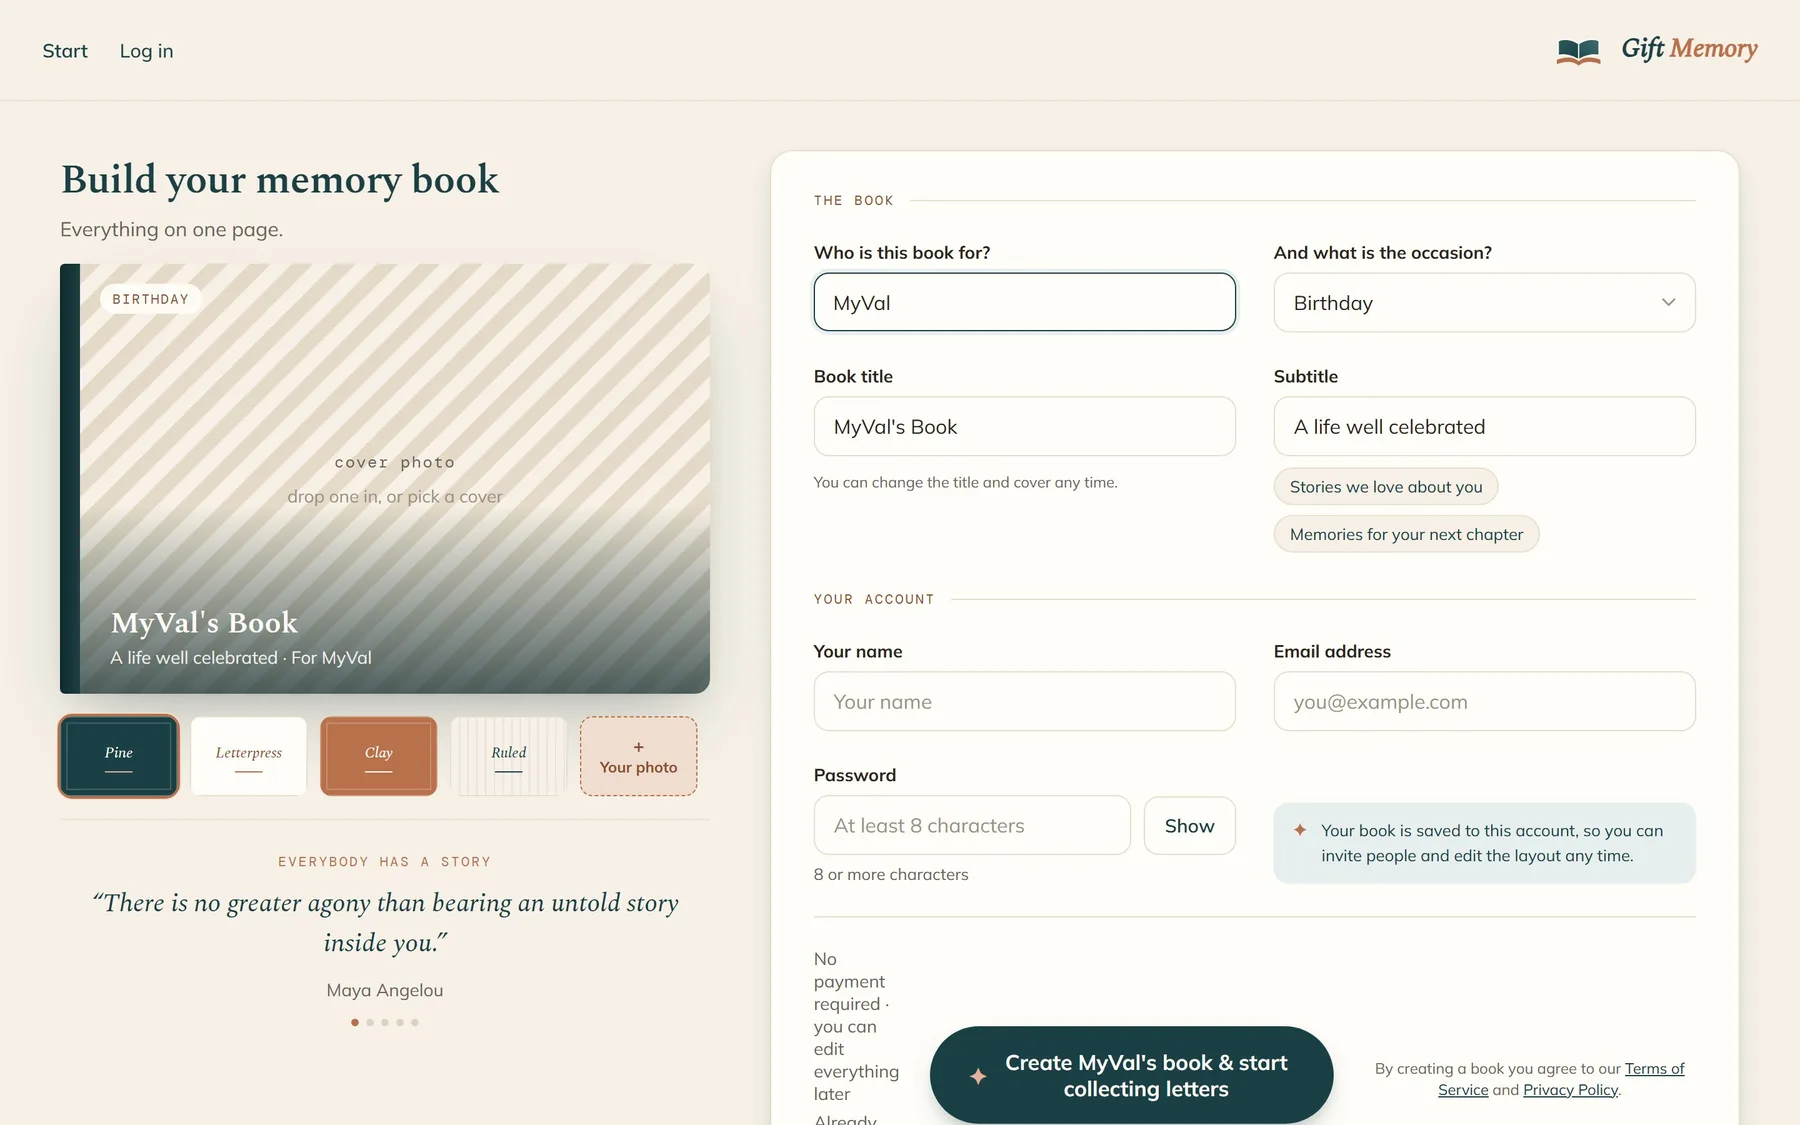
The Build your memory book screen with cover choices
Build your memory book: pick a cover, then tell us who the book is for

Next you'll see Your book is made and What's easiest to do next? Pick Add my photos & memories, or Copy this link to share one group link.
2. Invite your people

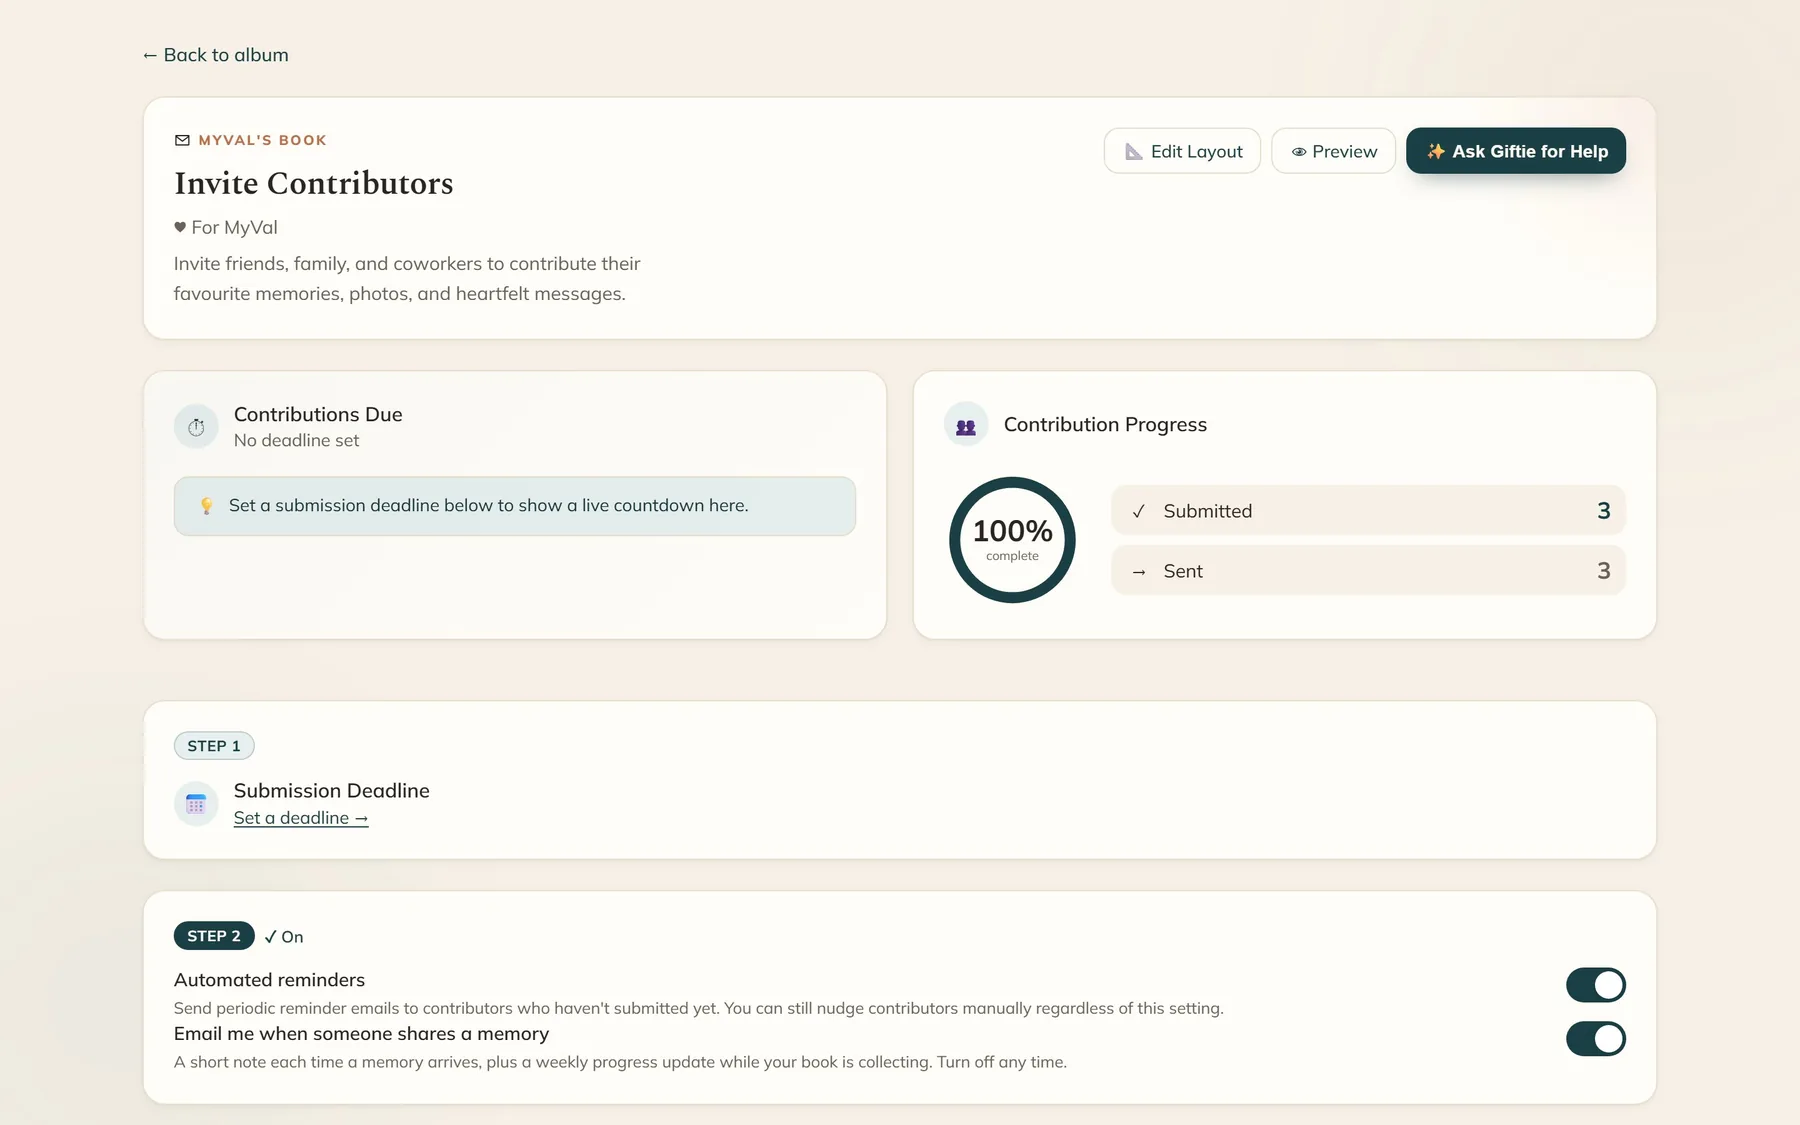
In the Album Studio, click People. The Invite Contributors page has four steps.

  1. 1

    Set a deadline.

    New books default to 14 days. Leave a few days before the occasion for designing and printing.
  2. 2

    Reminders.

    Keep Automated reminders on. You can also turn on Email me when someone shares a memory.
  3. 3

    Write your invitation.

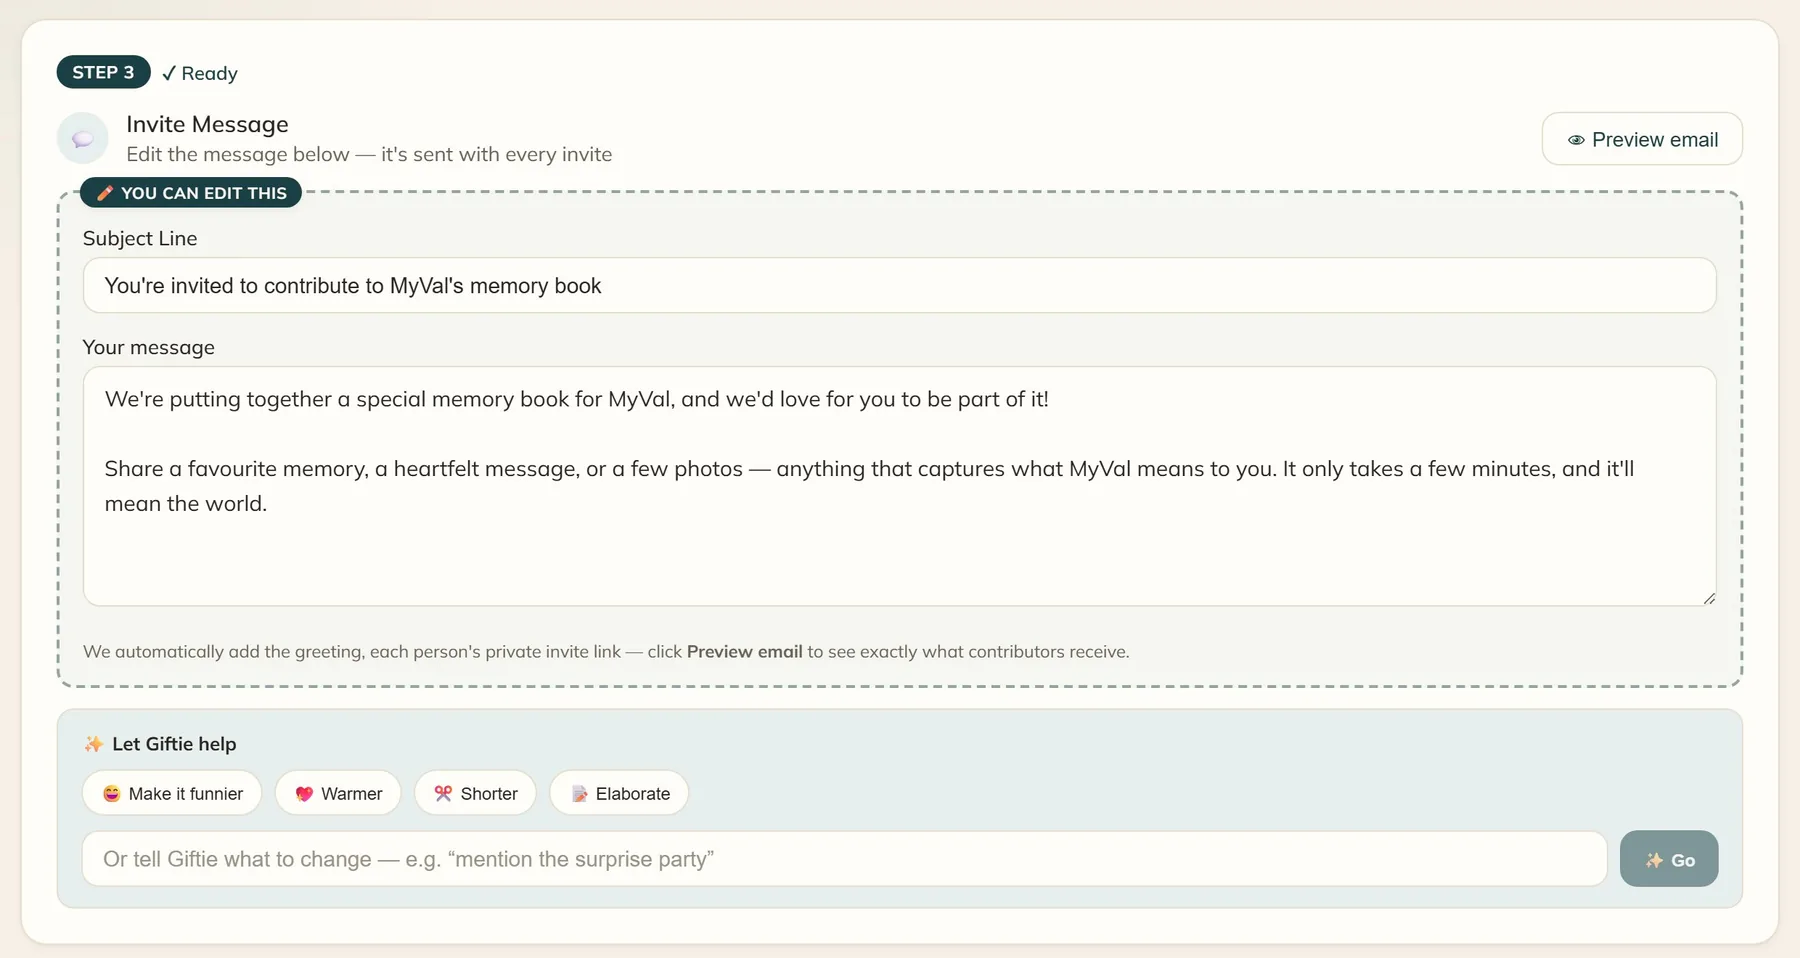
    Edit the Subject Line and Your message. We add the greeting and each person's private link for you. Preview email shows exactly what they'll get. Let Giftie help offers Make it funnier, Warmer, Shorter and Elaborate.
  4. 4

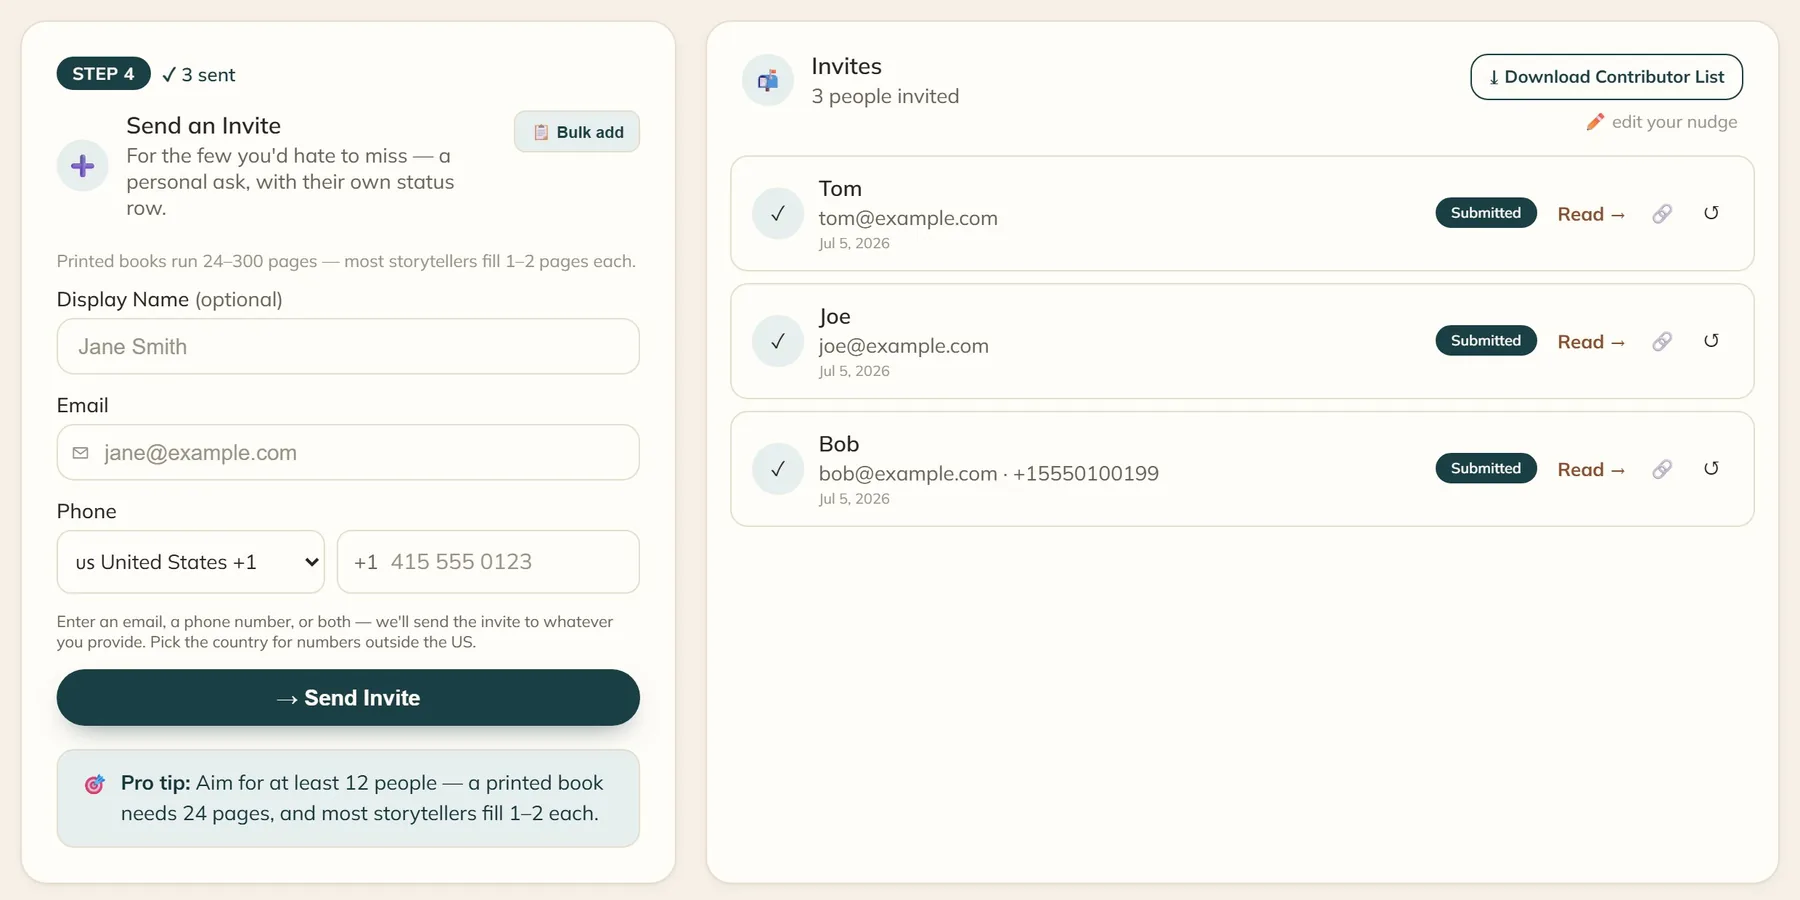
    Send it — either way, or both.

    Personal invites: add a name plus an email and/or mobile number, then Send Invite. Bulk add lets you paste in a list.

    One link for the whole group: click Create group link and paste it into a group chat. There's a QR code for cards and parties, too.

Writing the invitation message with Giftie options
Step 3: write your invitation, or let Giftie help

What's the best way to invite?

  • Send personal invites to the people who matter most. You can track each person and nudge only those who haven't written.
  • Use the group link for everyone else.
  • Aim for at least 12 people. A printed book needs 24 pages, and most people fill 1–2 pages each. A book can have up to 270 contributors.
  • Keep it a surprise: don't invite the guest of honor.

3. Add your own page

Yours is the one page nobody else can write.

  • Click Write your page in the Album Studio. You get the same letter page your contributors use.
  • Write your letter, add photos, and submit. Giftie can help with wording.
  • Want more than a letter? The Layout Editor's Author tab adds headings, paragraphs, quotes, extra photos, blank pages and a dedication.

Part two

Managing your book

Your Album Studio

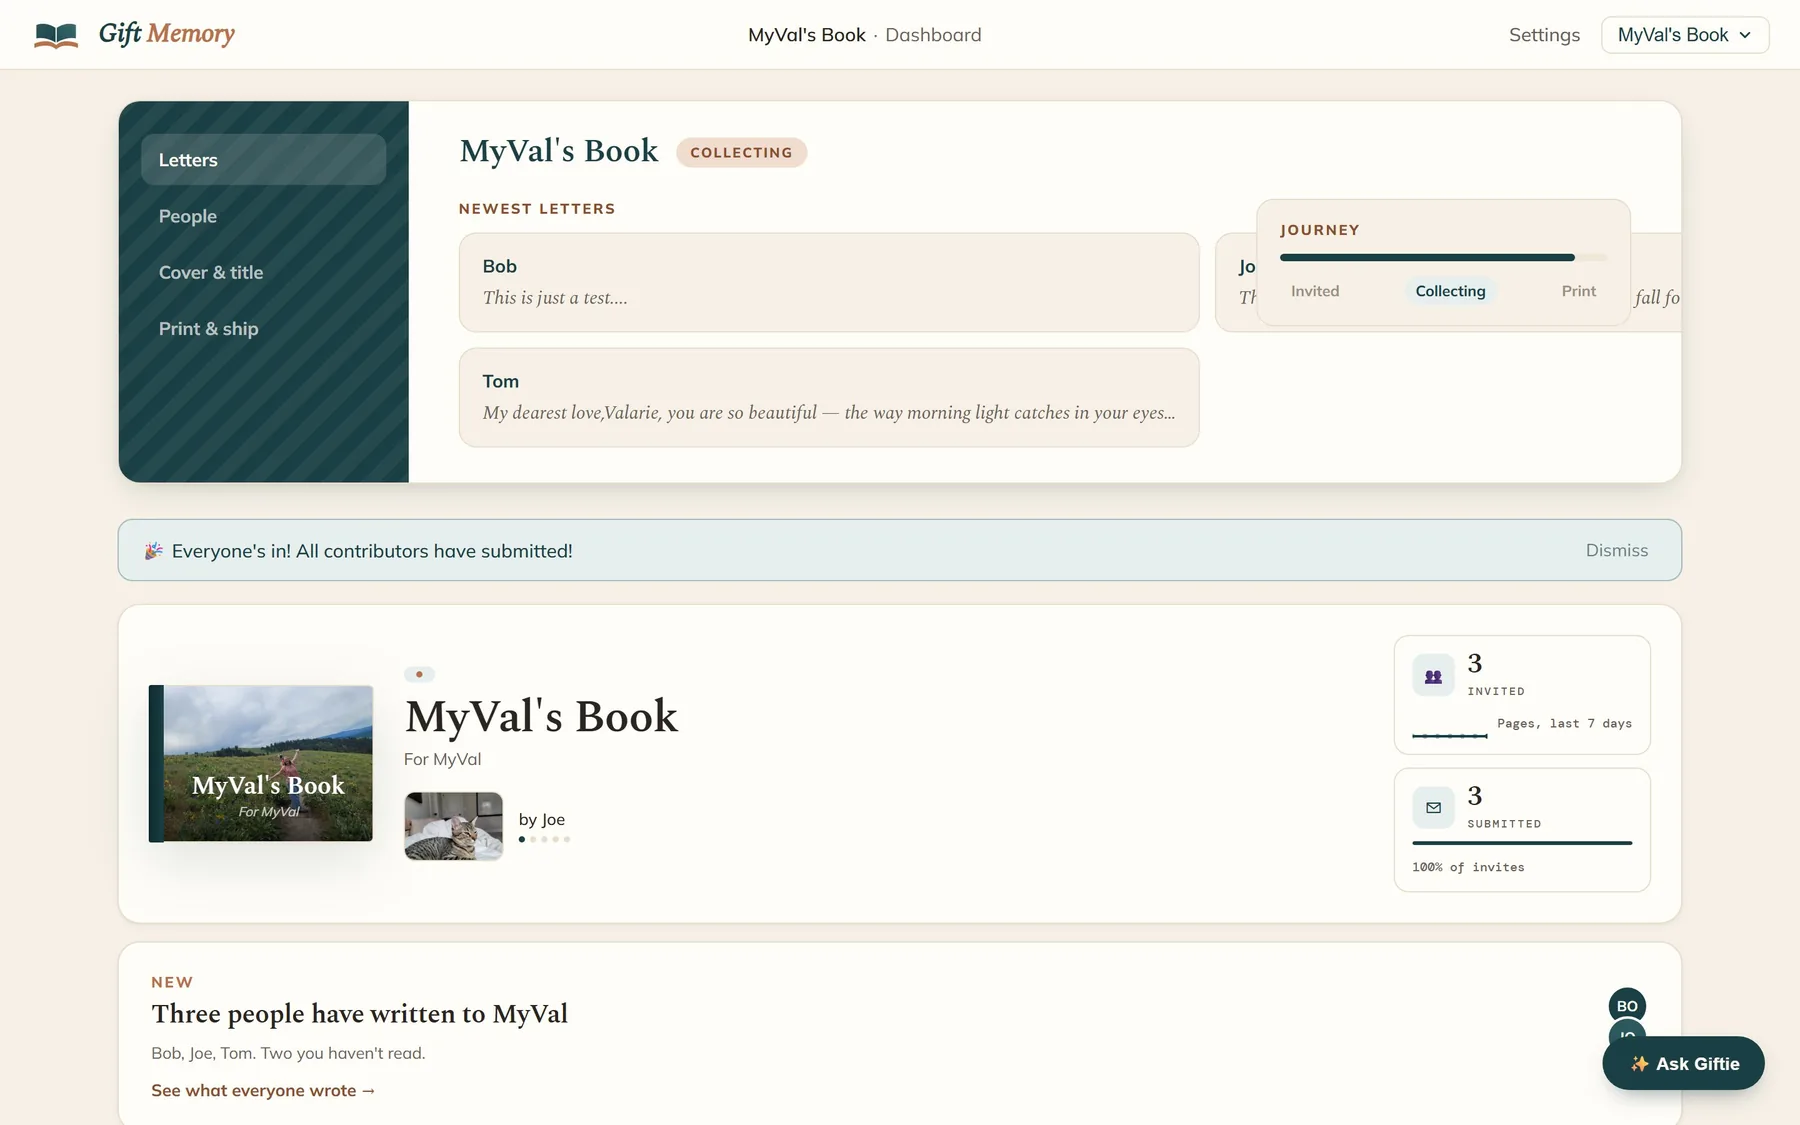
The left menu has:

  • Letters: the newest letters, and your journey from Invited to Collecting to Print.
  • People: invites and tracking.
  • Cover & title
  • Print & ship
The Album Studio home screen

Below that, Your Journey lists four steps:

  1. 1
    Create Album (Edit Album Details)
  2. 2
    Invite & Manage Contributors
  3. 3
    Manage & Preview Album: the Layout Editor, preview, and reading letters. This unlocks after your first invite.
  4. 4
    Export & Gift: review, finalize and order.

You'll also find Recent Activity, the Memory Wall, and Book a free 15-minute tour if you'd like us to walk you through it.

Contributors, start to finish

At the top

Contributions Due counts down to your deadline. Extend deadline adds time. The Contribution Progress ring shows how many letters are in.

Contributions Due countdown and progress ring

What each status means

  • Pending / Sent: the invite is on its way.
  • Opened: they clicked the link but haven't submitted yet.
  • Submitted: their letter is in.
  • Joined: they came in through the group link.
  • Delivery failed / Email off: we couldn't reach them. Check the address, or copy their link and send it yourself.

What you can do for each person

  • Nudge sends a reminder. Nudge All reminds everyone who hasn't written, and edit your nudge changes the wording.
  • Resend sends the invitation again.
  • Copy link copies their personal link.
  • Edit fixes contact details, then Save & resend. Remove takes them off the list and their link stops working. Edit and Remove only work before the person starts writing.
  • Add it for them lets you enter a memory someone sent you another way.
  • Read → opens their letter.
Send an Invite form beside the invite list with statuses
Send an Invite on the left, and your invite list with each person's status on the right

Video messages

A premium add-on. Contributors can record up to 3 short videos. It's paid for when you order the printed book, and you review each video before it goes in.

Reading their words

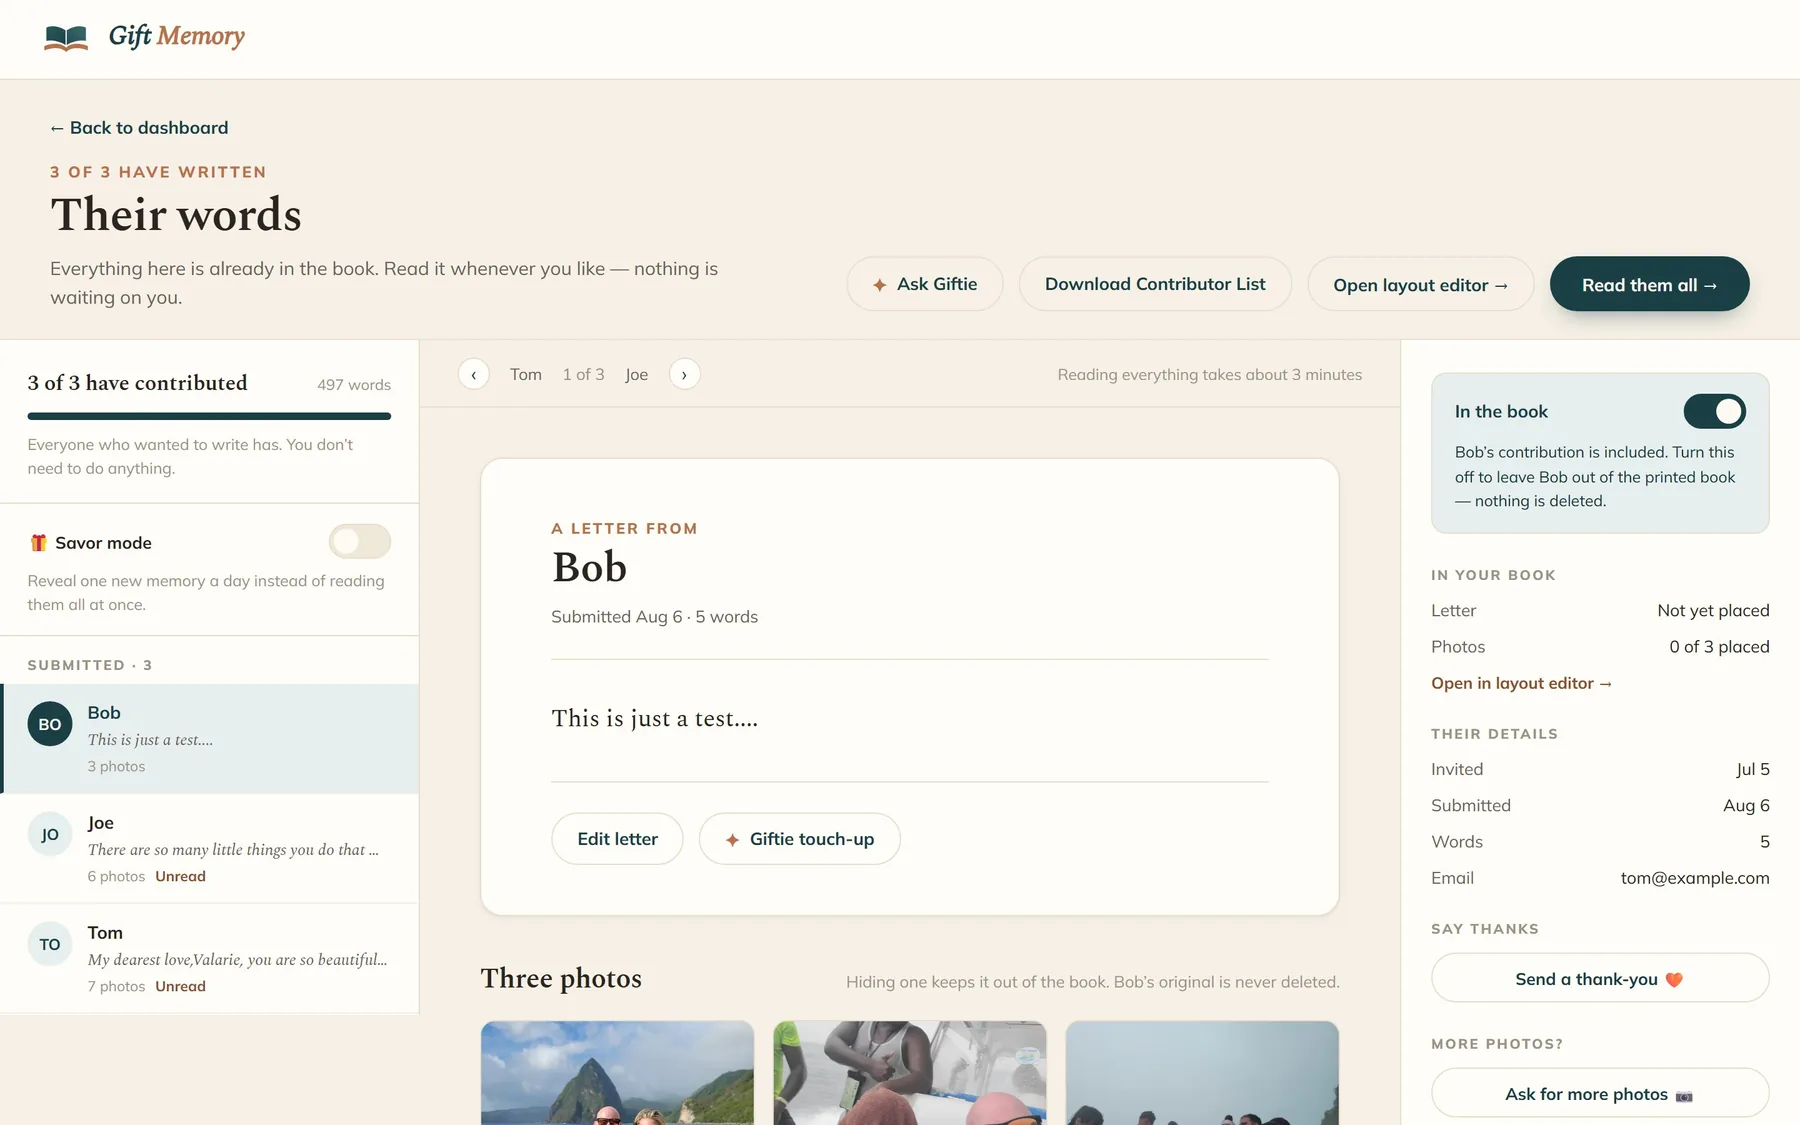
Read their words opens a reading room. Read them all → goes through every letter. Savor mode reveals one new memory a day.

The reading room showing contributors' letters
  • Edit letter fixes typos. Giftie touch-up tidies spelling, grammar, names and places.
  • The In the book switch leaves a letter out of the printed book without deleting it. You can hide individual photos, too.
  • Send a thank-you lets them know their letter landed. Ask for more photos invites them to add more.

Part three

The Layout Editor

This is where letters become pages. It works best on a laptop.

Authors vs. contributors

The Author

That's you. You invite people, read every letter, design the pages, add your own content and order the book. Only you can open the Layout Editor.

Contributors

Everyone you invite. They write a letter and add photos (and videos, if turned on) on their own page. They never see the editor or anyone else's letter, and they don't need an account.

A tour of the editor

You never start from a blank page. Each letter arrives already laid out.

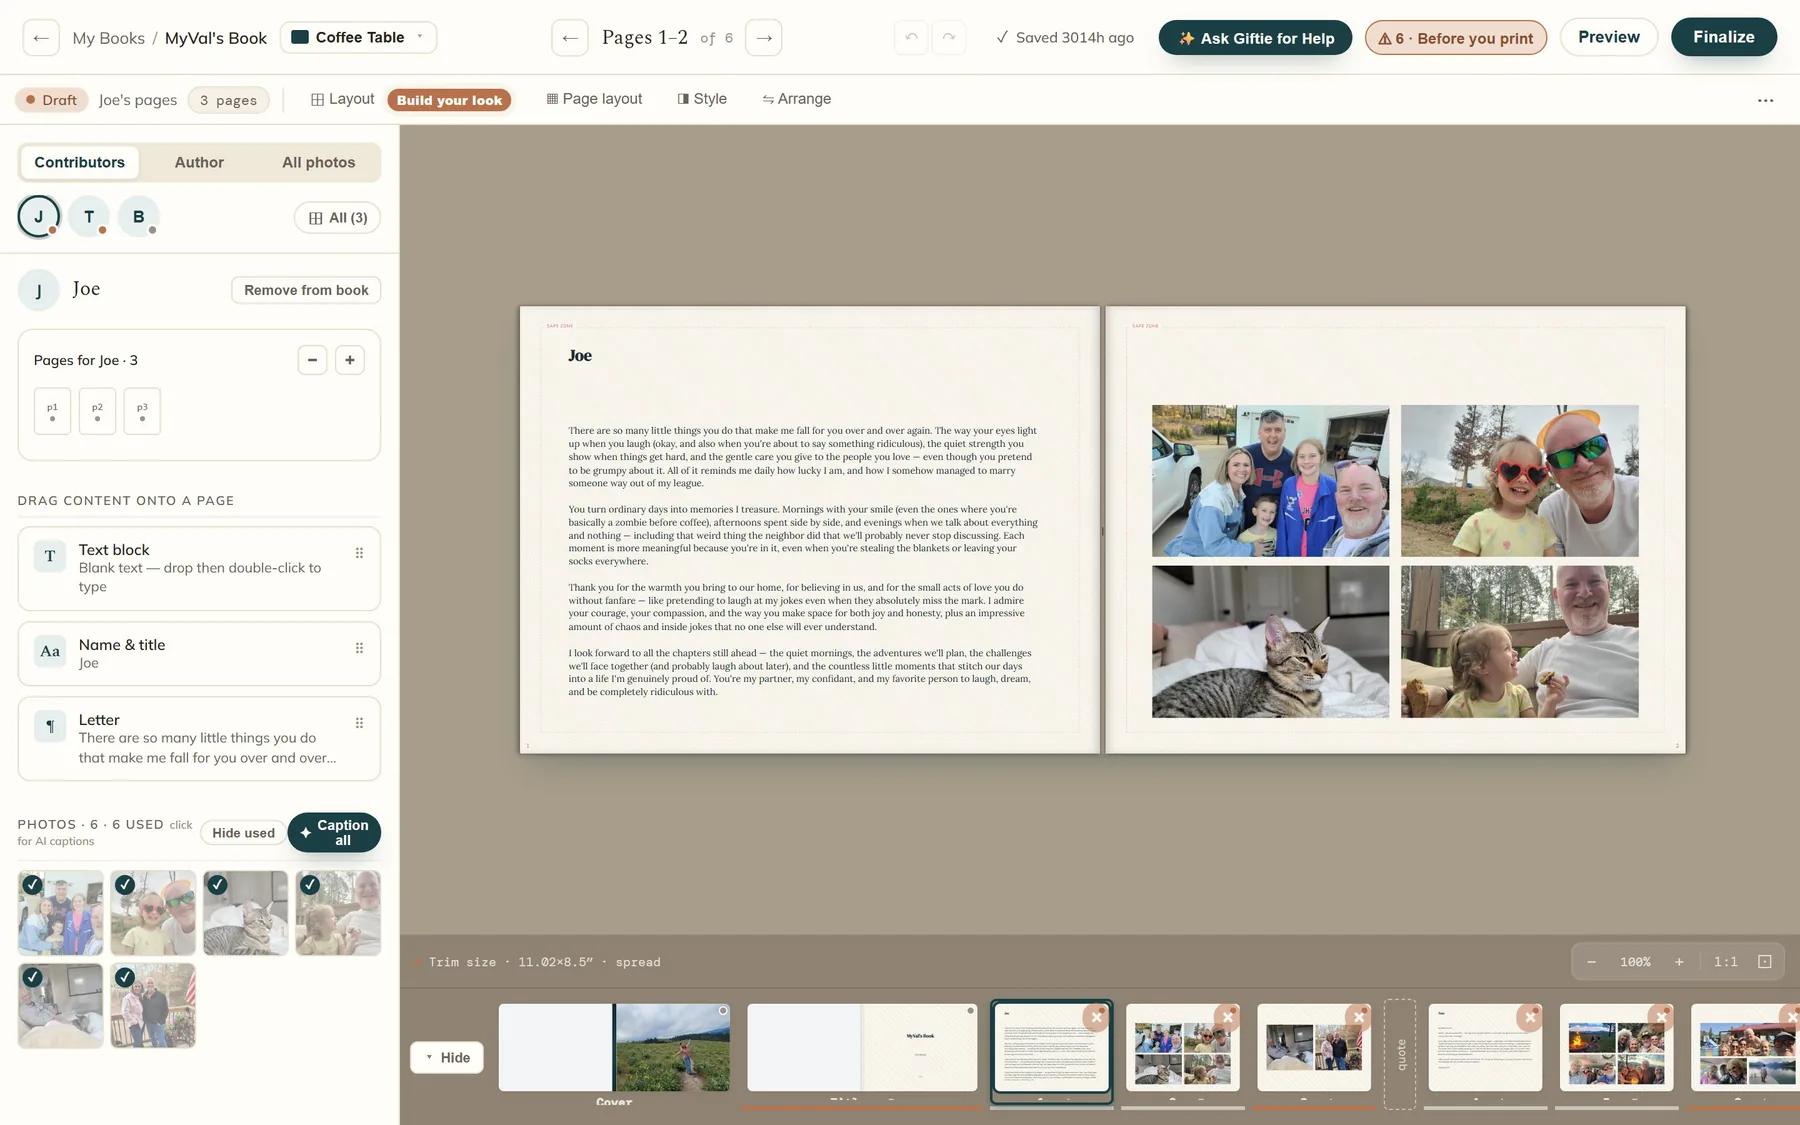
Open it with Open Layout Editor.

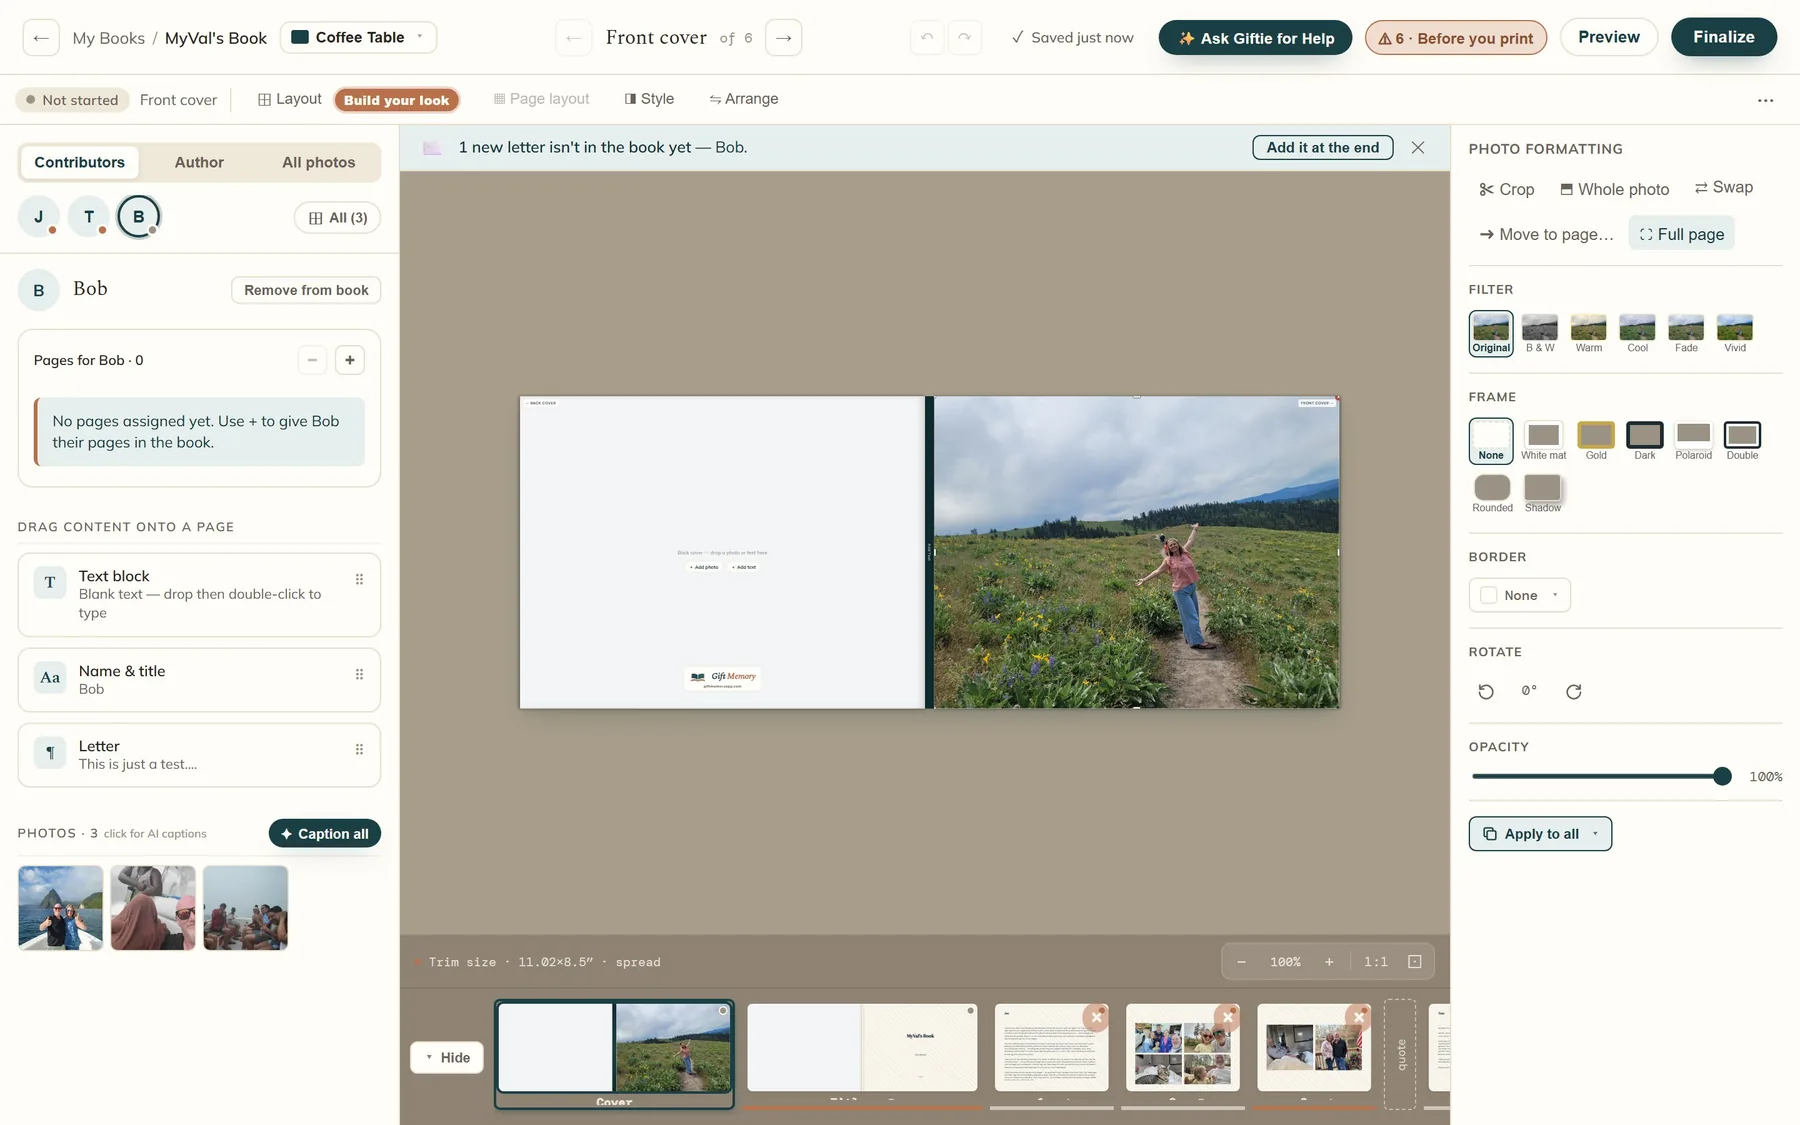
The Layout Editor with a page open

Along the top

  • Book size (Standard, Large or Coffee Table), page arrows, and Undo/Redo (Ctrl+Z / Ctrl+Y)
  • Ask Giftie for Help
  • Before you print, which flags anything that may not print well
  • Preview and Finalize

Tool tabs

  • Layout / Build your look: the look of the whole book.
  • Page layout: photo arrangements such as One big photo or Four, even grid. You can apply one to every page with the same number of photos.
  • Style: backgrounds (color/gradient, texture), dividers and stickers — for this page, one person, or everyone. Suggest asks Giftie for a theme.
  • Arrange: see Arrange your pages.
  • ⋯: remove the current page.

Left panel

  • Contributors: click a person to give them more or fewer pages, remove them from the book or add them back, drag their name, letter or photos onto a page, or Caption all.
  • Author: your own content.
  • All photos: filter to Unplaced to find photos that aren't on a page yet.

The strip along the bottom shows every page.

Adding & editing photos

  1. 1
    Click + Add photo, or upload in the Author tab (JPG or PNG; several at once is fine).
  2. 2
    Click a photo to open Photo formatting: Crop, Whole photo, Full page, Swap, Move to page….
  3. 3
    Style it: a filter (B & W, Warm, Cool, Fade, Vivid), a frame (White mat, Gold, Dark, Polaroid, Double, Rounded, Shadow), a border, rotation or opacity.
  4. 4
    Apply to all copies the look to other photos.
Photo formatting panel in the Layout Editor
Click any photo to crop, filter, frame or rotate it

Adding & editing text

+ Add text places a text box, or click any letter to edit it. You can change the font, size, bold/italic/underline, alignment, color and all-caps.

Part four

Look & feel

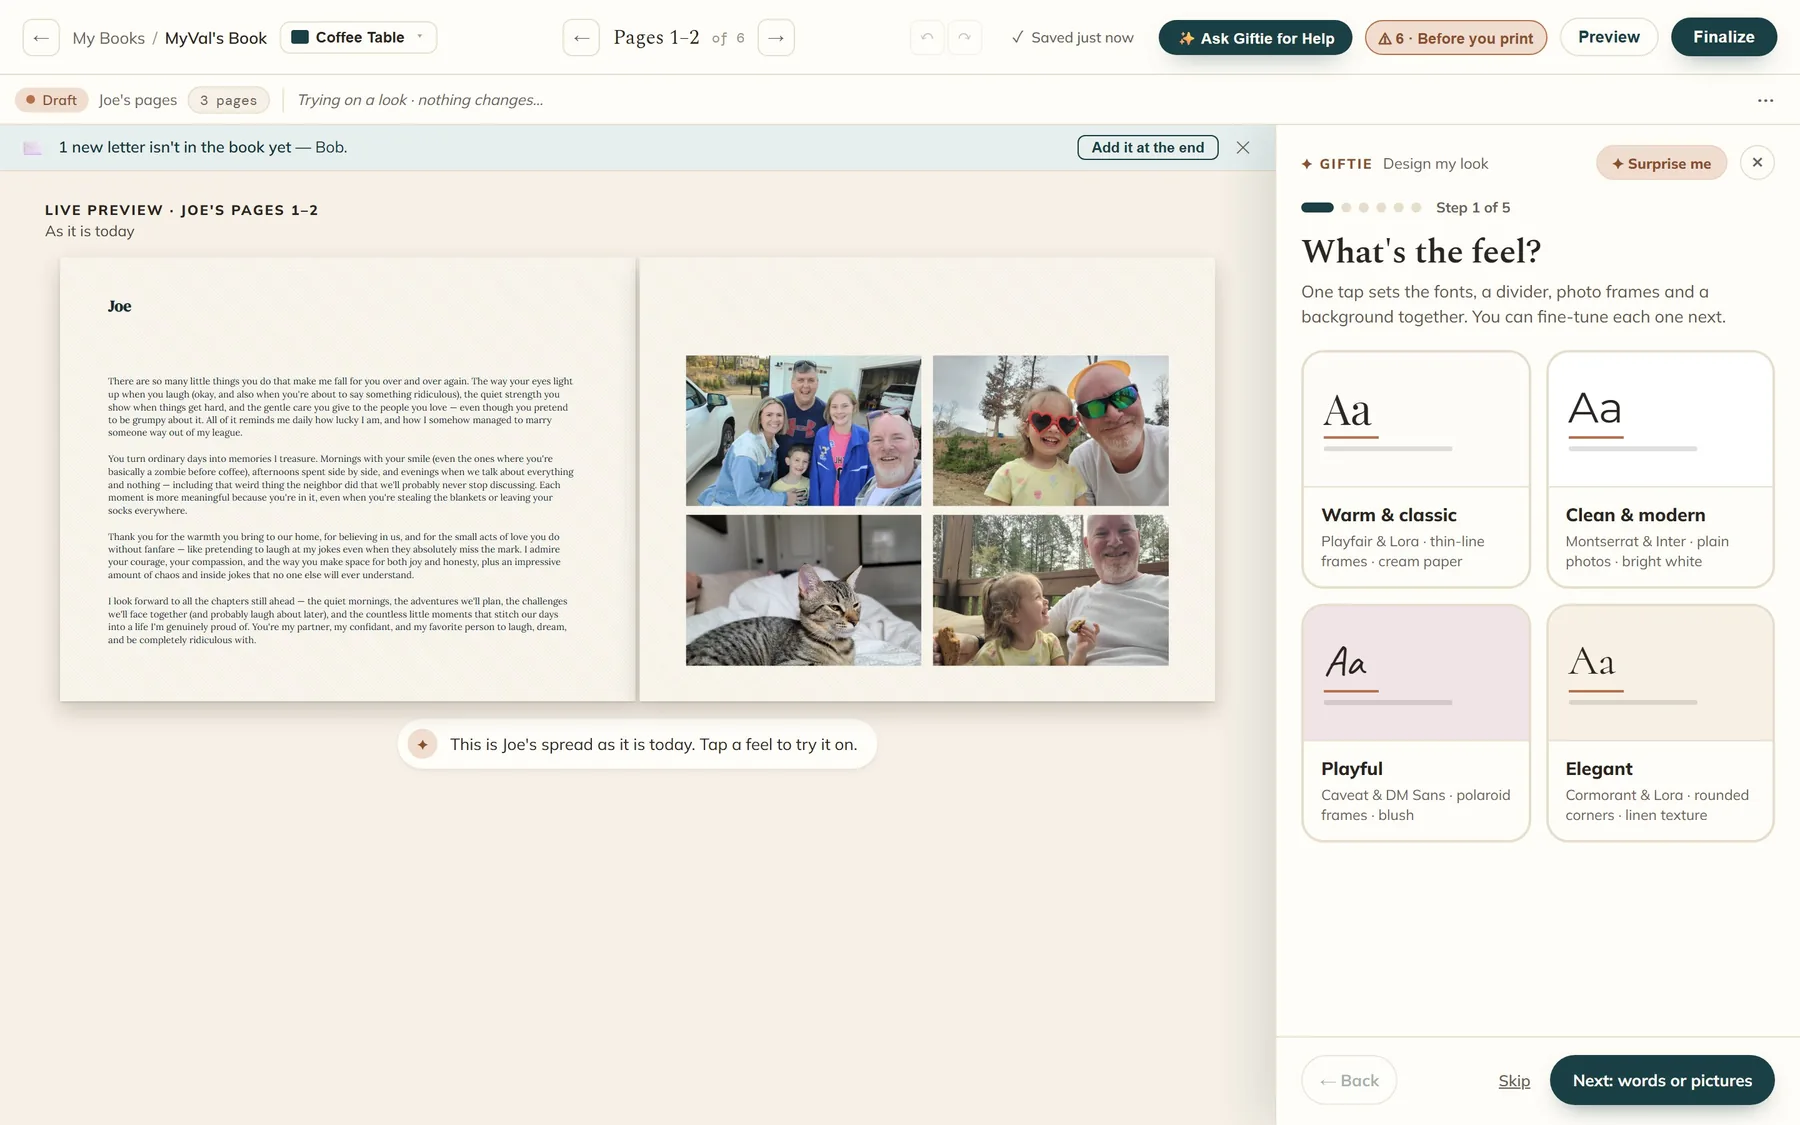
Design your look

Click Build your look, then Build your album layout. Giftie shows a live preview on real pages, and nothing changes until you apply. Five steps:

  1. 1

    What's the feel?

    Warm & classic, Clean & modern, Playful or Elegant.
  2. 2

    Words or pictures?

    Choose what leads on each page.
  3. 3

    How should photos look?

    Whole photo or fill the box, plus a frame.
  4. 4

    The words.

    Font pairing, size, and where names go.
  5. 5

    Background.

    Pick the backdrop for your pages.

Then name the look, tick Keep pages I've arranged by hand, choose everyone or this page, and click Apply look. Surprise me picks one for you.

Design my look with a live page preview
Design my look: tap a feel and see it on real pages before you apply it

Arrange your pages

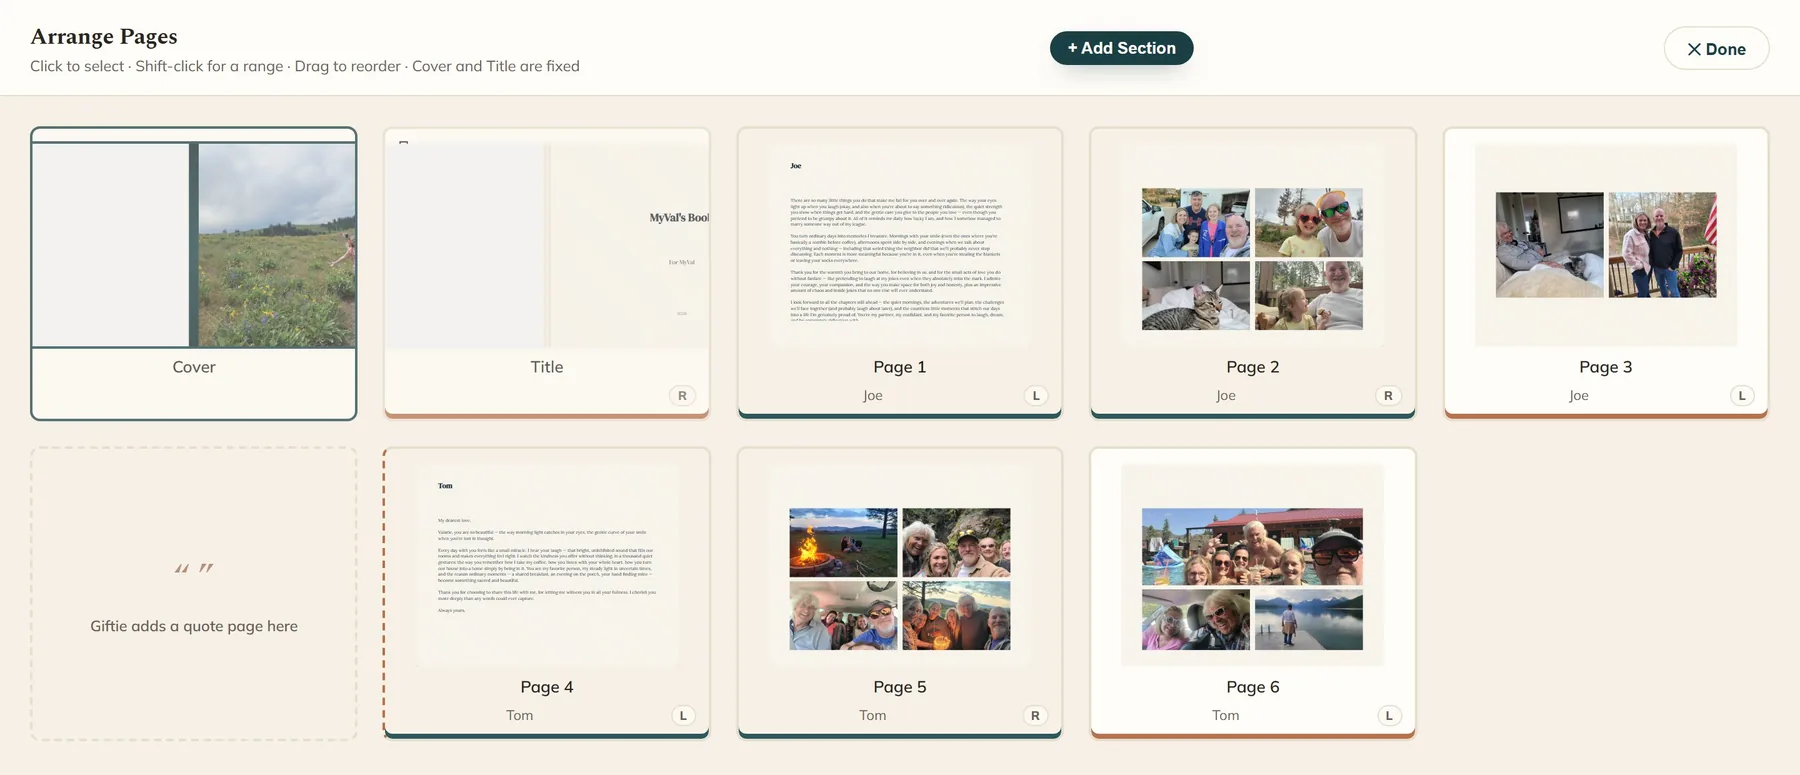
Arrange opens Arrange Pages:

  • Drag to reorder. Click to select, Shift-click for a range.
  • + Add Section adds divider pages (for example Family, Friends, Work).
  • Tighten pages closes gaps.
  • L/R markers show which side of the spread a page prints on. The Cover and Title stay first.
Arrange Pages showing every page of the book
Arrange Pages: every page at a glance. Drag to reorder.

Preview, finalize & order

  1. 1
    Preview flips through the book like a real one.
  2. 2
    Finalize: type I approve, then Approve & finalize. You can reopen the book for contributions later.
  3. 3
    Order a Printed Book: hardcover with glossy pages, 24–300 pages, standard or express shipping.
  4. 4
    Optional: after ordering the print, add a digital album — a private link where family can flip through the book and leave notes. A print order also includes Download Your Book, with every letter, photo and video.

Ready to start?

Creating a book is free. Questions? Write to us at support@giftmemoryapp.com.

Start your book — free to begin